Sun salutation, also called Surya namaskar in sanskrit. 'Surya' refers to the 'Sun' and 'Namaskar' means 'to salute'. The sun symbolizes the spiritual consciousness and was worshipped every day in ancient times. In yoga, the sun is represented by the pingala nadi which is an active nadi and carries the life-giving force. When performed the 24 steps rhythmically, it reflects the rhythm of the universe; the 24 hours of the day, the 12 zodiac phases of the year and the bio rhythms of the body.
The sun is a daily reminder that we too can rise again from the darkness, that we too can shine our own light.
What is the purpose of sun salutations?
Sun salutation is considered as a full body exercise and a great way to warm up before any other asanas specially in the morning. Each posture in the sequence focusses on a different body part and prepares one for more complicated postures.
It is an effective practise to stretch, massage and tone all the joints, muscles, and internal organs of the body. Spiritually, it helps in expanding the awareness by connecting the body, breath and mind.
This practise also activates the Solar plexus, Manipura chakra, situated in the navel area. This place is also called as our second brain and helps increasing the spiritual knowledge, intuitive power and creativity in the practitioner.
Surya Namaskar Benefits
Sun salutations have numerous benefits:
- It is a great cardiovascular exercise and works on every part of the body.
- It improves the blood circulation to the scalp and nourishes it. Therefore, helps in preventing hair loss. It also helps in your skin glow.
- It balances the metabolism therefore good for digestive system.
- It helps relieving the symptoms of stress and anxiety.
Can surya namaskar reduce belly fat?
Yes, it is an intensive exercise that consists of forward bend, backward bend, full body stretches. If you do this practise everyday and increase the rounds slowly, it helps you lose weight and keeps you in shape.
What happens if you do surya namaskar everyday?
It can help regulate or balance the pingala nadi which can lead to a balanced energy system at both mental and physical levels.
What are the precautions of surya namaskar?
General precautions of surya namaskar are as follows:
- Don't practise if have fever or inflammation, boils or rashes in the body.
- People with back conditions should do it slowly and gently with no or mild back bend. If have any major issues like slipped disc, sciatica, etc., it is advisable to consult with a doctor first.
- It shouldn't be practised by people who have high blood pressure, coronary artery disease or who have had a stroke as it may over stimulate a weak heart or a vessel.
- Avoid practising during menstruation.
- Avoid the practise if have hernia or any major surgeries.
how many steps are there in surya namaskar
Surya Namaskar is a combination of 12 essential Asanas. When we do this Sun Salutation, every part of our bodies stretches. There are 12 steps in one Surya Namaskar round.
Step By step Instructions on How to do Sun Salutation
Sun salutation or Surya Namaskar is performed by practicing 12 poses of Surya Namaskar while facing the sunrise. The 12 Steps of Surya Namaskar are:
-
Step 1: Exhale - PRANAMASANA (Prayer pose)
Stand upright with feet together and eyes closed. Place your palms together in front of your chest in namaskar mudra. Relax the whole body.
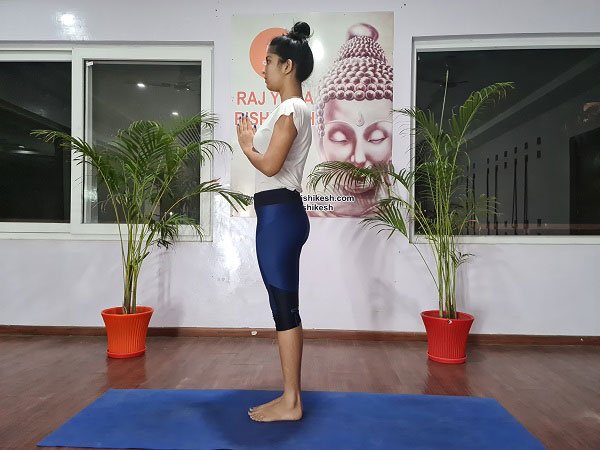
Beginner's Tip
You can have your feet hip width apart if you have lower back problems, or if your knees/thighs are rubbing against each other.
Step 2: Inhale - HASTA UTTANASANA (Raised arms pose)
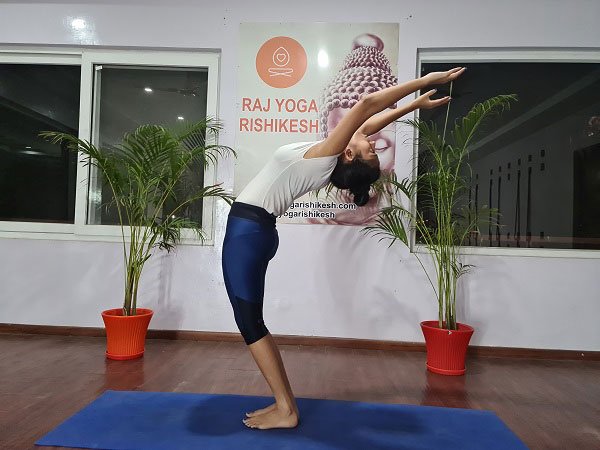
Raise the arms up above the head keeping them shoulder width apart. Bend your arms, head and torso backward slightly.
Beginner's Tip
Don't bend back if have back pain. Only raise the arms up keeping the torso erect.
Step 3: Exhale - PADAHASTASANA (Hand to foot pose)
Bend forward from the hips keeping the spine straight. Bring the fingers or palms touching the mat on either side of the feet. Bring your forehead closer to the knees. Do not strain.
Beginner's Tip
If your hamstrings are tight, keep the knees slightly bent initially. Bring the palms on to your shin bone or ankles if you can't reach the floor.
Step 4: Inhale - ASHWA SANCHALANASANA (Equestrian pose/Horse riding pose)
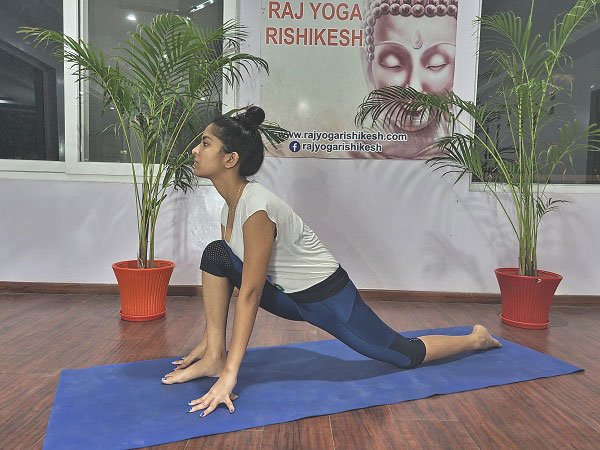
Place both palms on the mat beside the feet and stretch the right leg back as far as it is comfortable. Bend the left knee at the same time ensuring the left knee and ankle are stack on top of each other. Your hands or tips of the fingers are touching the mat. Arch back slightly or keep looking straight.
Beginner's Tip
Keep the back knee on the floor.
Step 5: Retain the breath - DANDASANA (Plank pose)
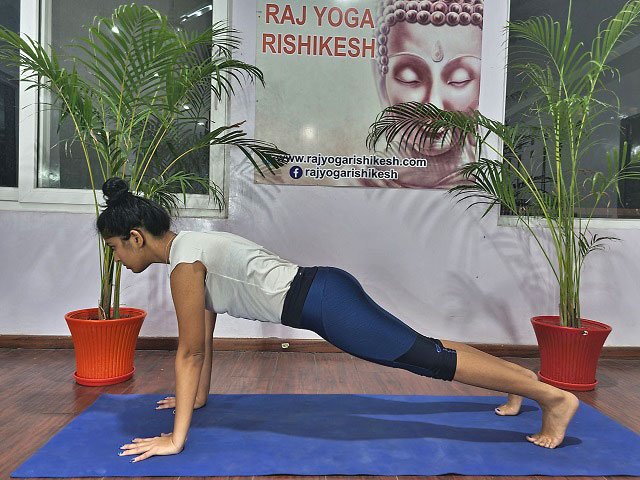
Bring the palms back onto the floor on the either side of your feet. Bring the left foot back close to the right leg ensuring your legs, buttock and torso are in one line making a plank. Your shoulders and wrists are stack over each other perpendicular to the floor. Maintain the gaze in front.
Beginner's Tip
Try not to bring the buttocks too high up or too low.
Step 6: Exhale - ASHTANGA NAMASKARA (8 limbs salute)
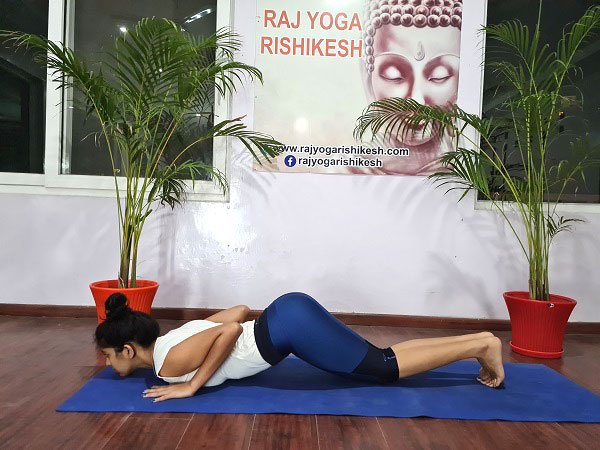
Keeping the palms and feet where they are, lower the knees, chest and chin on the mat simultaneously. Keep the elbows bent and tucked in closer to the chest. The hips and abdomen remain raised off the mat.
Beginner's Tip
Lower the knees first then the chest and chin.
Step 7: Inhale - BHUJANGASANA (Cobra Pose)

Keeping the hands and feet in place, slide and raise the chest up. The elbows are slightly bent, and the shoulders are relaxed and away from the neck. Tilt the head back, the hips and knees are on the mat.
Beginner's Tip
Don't tilt the head back if have cervical issues.
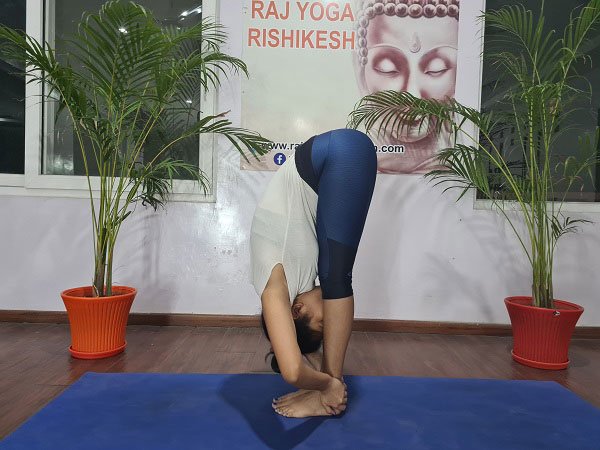
Step 8: Exhale - PARVATASANA (Mountain pose)

Keep the hands and feet in the same position. Use your arm's strength to lift the buttocks up and lower the heels to the mat. Lengthen the whole spine keeping the arms and legs straight and assuming a mountain shape. Your arms are shoulder width apart and legs are close together.
Beginner's Tip
Keep the knees bent initially if the hamstrings are too tight.
Step 9: Inhale - ASHWA SANCHALANASANA (Equestrian pose)
Bring the right foot forward between the hands and lower the left knee on the mat simultaneously, and push the pelvis forwards. Lift the torso and tilt the head back or keep looking straight (Same as step 4).
Step 10. Exhale - PADAHASTASANA (Hand to foot pose)
Step 11: Inhale - HASTA UTANASANA (Raised arms pose)
Step 12: Exhale - PRANAMASANA (Prayer pose)
NOTE: This is only half round of sun salutation with the right leg. The other half round is performed with the left leg which makes a complete one cycle of sun salutation.
The best time to practise sun salutation is at sunrise. But it can be practised anytime provided that the stomach is empty. It is a great way to warm up at the beginning of your yoga session. Whenever possible, practise it in open space with fresh space, facing the rising sun.
As a beginner, you can start with 2 or 4 rounds and gradually as your stamina builds up, you can do as many as you can. You can even practise 108 times which is an auspicious number.