
Moon salutation, called Chandra Namaskar consists of two words, 'chandra' means 'moon' and 'namaskar' means 'to salute'. The practice of Moon Salutation is a reflection of Sun Salutation (Surya Namaskar), just as the moon has no light of its own but reflects the light of the sun. The sequence of asanas is the same as Surya Namaskar except that Ardha Chandrasana is performed after Ashwa Sanchalanasana (Horse-riding pose).
Ardha Chandrasan, the half-moon pose, is a significant posture as it develops concentration and balance. This pose helps activating the ida nadi, the lunar force in the system responsible for consciousness. Ardha Chandrasan works on the throat chakra or Vishuddhi chakra on a spiritual level.
Moon salutation can be more demanding than Sun salutation as inhalation, exhalation and breath retention are all prolonged in the sequence. This 14-step sequence represents the different phases of the moon in the lunar cycle. If practised with utmost gratitude and devotion, this practise can evoke divine feminine energy in you.
Sun and Moon Salutation sequences embrace different qualities but they complement each other perfectly.
When to do moon salutation?
Moon Salutation is best practiced in the evening or at night, especially when the moon is visible. Ensure that the stomach is empty before practising these asanas.
Moon Salutation benefits
Moon Salutation helps you channelizing the lunar energy; which has cool, relaxing, and creative qualities. Chandra Namaskar also stretches and strengthens the spine, hamstrings, backs of legs and stomach muscles. It also balances the functioning of the circulatory, respiratory and digestive systems.
STEP BY STEP INSTRUCTIONS ON HOW TO DO CHANDRA NAMASKAR
-
Step 1: Exhale - PRANAMASANA (Prayer pose)
Stand upright with feet together and eyes closed. Place your palms together in front of your chest in namaskar mudra. Relax the whole body.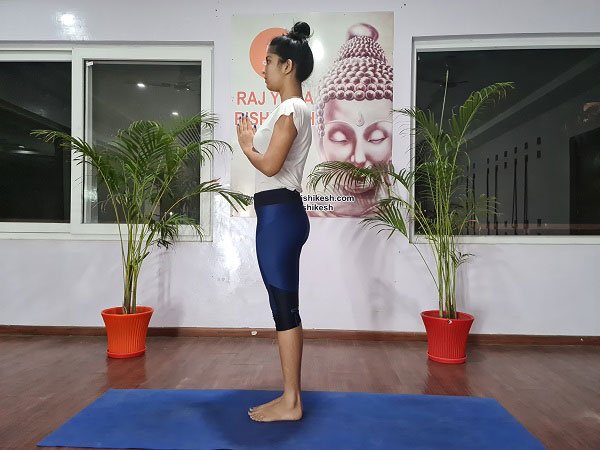
Beginner's Tip
You can have your feet hip width apart if you have lower back problems, or if your knees/thighs are rubbing against each other.
Step 2: Inhale - HASTA UTTANASANA (Raised arms pose)
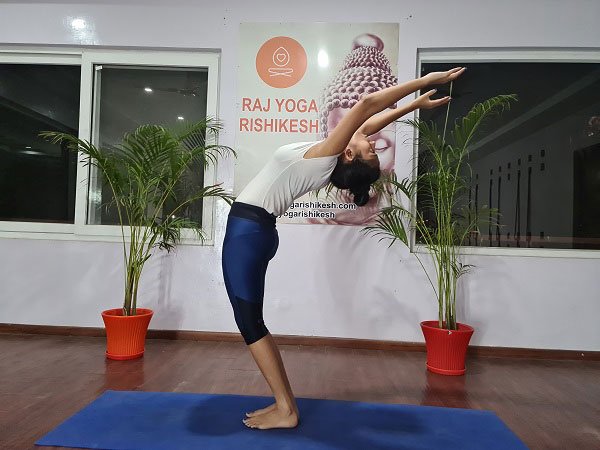
Raise the arms up above the head keeping them shoulder width apart. Bend your arms, head and torso backward slightly.
Beginner's Tip
Don't bend back if have back pain. Only raise the arms up keeping the torso erect.
Step 3: Exhale - PADAHASTASANA (Hand to foot pose)
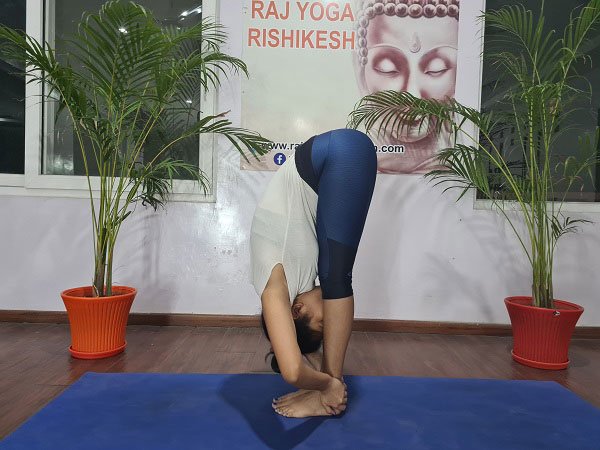
Bend forward from the hips keeping the spine straight. Bring the fingers or palms touching the mat on either side of the feet. Bring your forehead closer to the knees. Do not strain.
Beginner's Tip
If your hamstrings are tight, keep the knees slightly bent initially. Bring the palms on to your shin bone or ankles if you can't reach the floor.
Step 4: Inhale - ASHWA SANCHALANASANA (Equestrian pose/Horse riding pose)
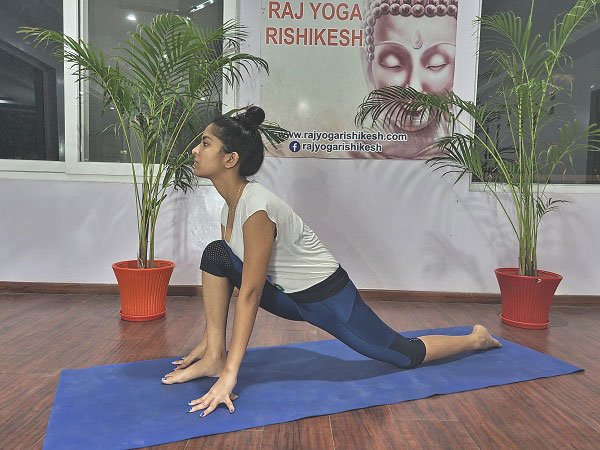
Place both palms on the mat beside the feet and stretch the right leg back as far as it is comfortable. Bend the left knee at the same time ensuring the left knee and ankle are stack on top of each other. Your hands or tips of the fingers are touching the mat. Arch back slightly or keep looking straight.
Beginner's Tip
Keep the back knee on the floor.
Step 5: Inhale - ARDHA CHANDRASANA (Half-moon pose)
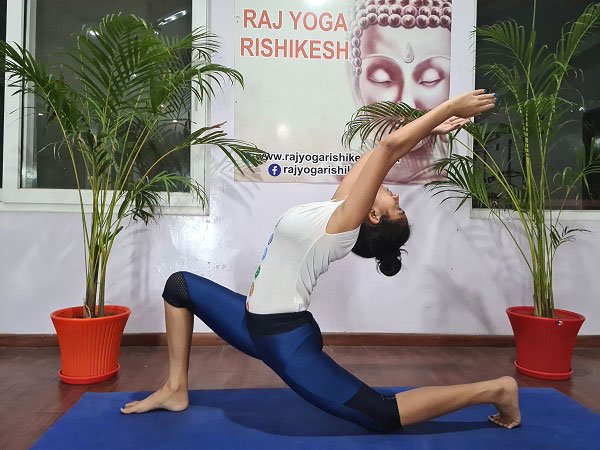
Maintaining Ashwasanchalana pose, raise your arms up and stretch over the head. Arch the back and look up. There is a gentle curve from the tips of the fingers to the tips of the toes, resembling a crescent moon. Hold the pose for a short while.
Beginner's Tip
Bring the back knee onto the floor. Don't bend back if have back pain or neck pain. Keep your torso and gaze facing forward.
Step 6: Retain the breath - DANDASANA (Plank pose)
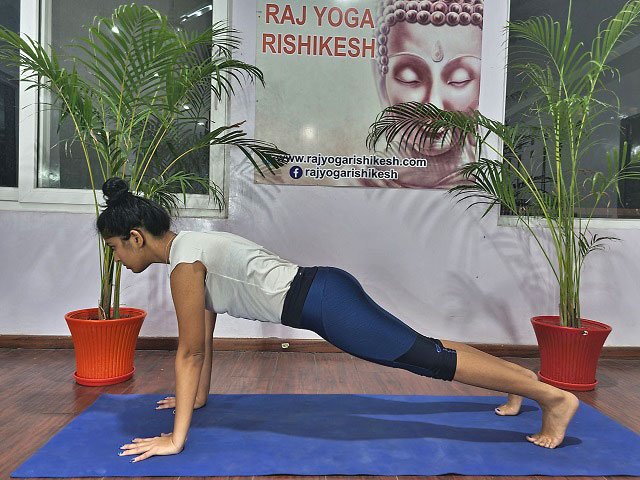
Bring the palms back onto the floor on the either side of your feet. Bring the left foot back close to the right leg ensuring your legs, buttock and torso are in one line making a plank. Your shoulders and wrists are stack over each other perpendicular to the floor. Maintain the gaze in front.
Beginner's Tip
Try not to bring the buttocks too high up or too low.
Step 7: Exhale - ASHTANGA NAMASKARA (8 limbs salute)
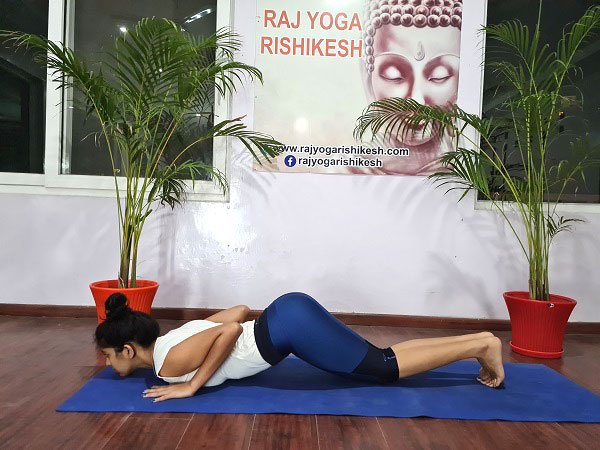
Keeping the palms and feet where they are, lower the knees, chest and chin on the mat simultaneously. Keep the elbows bent and tucked in closer to the chest. The hips and abdomen remain raised off the mat.
Beginner's Tip
Lower the knees first then the chest and chin.
Step 8: Inhale - BHUJANGASANA (Cobra pose)

Keeping the hands and feet in place, slide and raise the chest up. The elbows are slightly bent, and the shoulders are relaxed and away from the neck. Tilt the head back, the hips and knees are on the mat.
Beginner's Tip
Don't tilt the head back if have cervical issues.
Step 9: Exhale - PARVATASANA (Mountain pose)

Keep the hands and feet in the same position. Use your arm's strength to lift the buttocks up and lower the heels to the mat. Lengthen the whole spine keeping the arms and legs straight and assuming a mountain shape. Your arms are shoulder width apart and legs are close together.
Beginner's Tip
Keep the knees bent initially if the hamstrings are too tight.
Step 10: Inhale - ASHWA SANCHALANASANA (Equestrian pose)
Bring the right foot forward between the hands and lower the left knee on the mat simultaneously, and push the pelvis forwards. Lift the torso and tilt the head back or keep looking straight (Same as step 4).
Step 11: Inhale - ARDHA CHANDRASANA (Half-moon pose)
Step 12. Exhale - PADAHASTASANA (Hand to foot pose)
Step 13: Inhale - HASTA UTANASANA (Raised arms pose)
Step 14: Exhale - PRANAMASANA (Prayer pose)
NOTE: This is only half round of moon salutation with the right leg. The other half round is performed with the left leg which makes a complete one cycle of moon salutation.
You may do one or three complete rounds of Chandra namaskar in the beginning. Slowly you can increase the number of rounds as you build your stamina. It is advisable to listen to your body and work within your own potential. For spiritual benefits, you can practise 3 to 7 rounds slowly and consciously with prolonged breathing pattern.
Gentle and even breathing through both nostrils as you move your body into different asanas will provide the meditative aspect to your practice. You can try the moon salutation on a full moon night to enhance the calming and meditative qualities within yourself. This practise is also greatly beneficial in hot weather or when the energies are high to give us more calming and cooling effects.
Sun salutation practise is associated with activity and heat whereas moon salutation is more meditative and cooling in nature. Sun salutation is a dynamic sequence of poses which is often performed at the beginning of a class as a warm up exercise whereas moon salutation can be used as a restorative sequence to create calm and cooling effects on the body.
It is recommended to learn Sun salutation before trying Moon salutation as the postures are same for both except for one additional posture. You can read our article or watch YouTube video on step by step instructions on how to do sun salutation for the details.


Author | Yogi Sandeep
Born in Rishikesh in the foothills of the Himalayas, into a traditional family where yoga/Vedic tradition has been the way of life for generations.
Yogi Sandeep is a world-traveling yoga teacher and founder of the yoga school Raj Yoga Rishikesh. His teachings have helped many from all over the world.
He is an E-RYT500 Teacher (Certified by YogaAlliance), a Master in Yoga from University in India, and has over a decade of experience in yoga teaching. He conducts yoga teacher training, various yoga courses, and yoga retreats in Rishikesh, India.
He has been traveling around the world and sharing this beautiful knowledge of his passion for body and mind work. His simple and contemporary style of delivering deep yogic philosophy, meditation, and hatha yoga concepts endears him to his students.